
FACILITY PORTAL

Yellow (UA): Order is confirmed but not yet assigned to a driver.
Blue (AS): Order has been assigned to a driver.
Brown (PA): Order has been "Pre-Assigned." Typically the night before when schedules are created.
Green (IR): Driver is "In Route."
Green (LO): Patient is "Loaded" and in transport.
Purple (WC): A return that is in "Will Call" status. When there is an unknown return time.
Gray (CO): Order has been completed.
Red (CA): Order has been canceled.
Orange (NS): Patient was a "No Show."
HOW TO ADD AN ORDER
HOW TO REQUEST FUTURE APPOINTMENTS
This guide provides a step-by-step process for requesting future appointments through Shuttleliner Medical's online platform. Please note, all new and edited orders will be pending approval.
1. Enter username and password.

2. This will be the landing page. Click "Orders" on the left.
3. Click "Add Order."
4. Select the facility from the drop-down menu.
5. Enter all required information; name, DOB, phone number, and weight.
6. Click the "PU Address" field. Enter pick-up address. Google validates each address, therefor the address must be selected when it appears in the drop-down.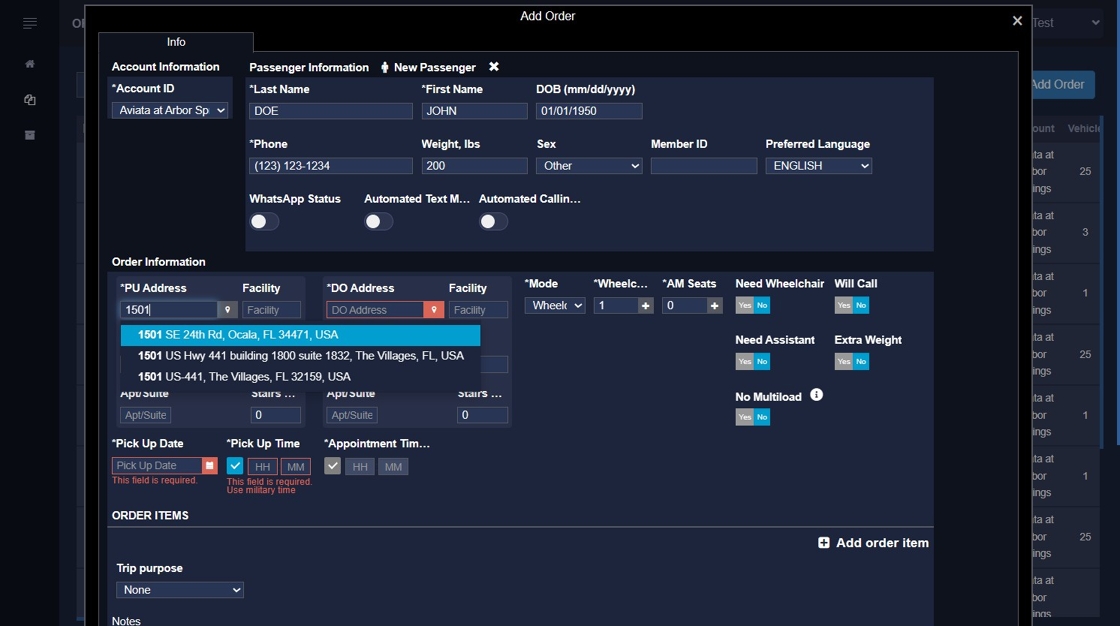
7. Click the "Room" field. Enter facility room number including the "Bed" if known.
8. Click the "DO Address" field. Enter the Appointment Address and select the validated address from the drop-down.
9. Select the "Mode," and choose wheelchair or stretcher.
10. Choose the date of appointment.
11. ALL TIME IS 24-HOUR (MILITARY) TIME, i.e. 2pm = 14Pick-up time is one hour prior to appointment time. We will change as needed.

12. Enter appointment time, but do not click blue check. Leave blue check highlighted on pick-up time.
13. Enter appointment notes, i.e., doctor's name, appointment type etc.
14. Click "Round Trip" for return trip.
15. "Will Call" is enabled by default. If a return time is known, disable "will call" and a pick-up time field will show.Otherwise, click "Round Trip," scroll to the bottom and save the order.

16. Save the order. Shuttleliner dispatchers will be notified of the order. Once approved, it will move into "unassigned" status on the date of the appointment.
SEARCH PAST, CURRENT, AND FUTURE ORDERS
1. Click "Reservations" in the left panel.

2. Enter past or future date parameters.
3. Click "Statuses" and choose filter.
4. The example below filtered all completed orders for the month of October.